

Setup Tools: An Overview of Tools and the Adjustments for Executing a Proper Setup.
Prologue
I’m a fervent defender of my belief that every guitarist should understand how to setup their guitars. Time, tools, and skill may make it difficult for many, but it doesn’t have to be. I’ve met some luthiers and techs that like to keep the process vague to their clients, keeping the ‘bread and butter’ work coming in while maintaining some mysticism about their work. I dissent. I’ve always found that explaining the process has built a better understanding of the instrument for the client and a better relationship between myself and my clients. No smoke and mirrors. The setup process isn’t esoteric knowledge but, unfortunately, the internet has helped disorient some from executing it properly on their own.
The Process
When the guitar is tuned to pitch, the following areas of the guitar should be addressed in the order shown below.
- The neck (making truss rod adjustments)
- The bridge (setting the strings’ height across the fretboard)
- The nut (string height and its importance on intonation)
- Pickups (adjusting the fulcrum of your electrified tone)
- Intonation (playing in tune across the fretboard)
Adjusting one part of the guitar affects other parts of the guitar and to avoid a circle pit of rage, a systematic approach is required. As I became more knowledgable in setup work, I developed my process to the point where I generally work on areas simultaneously, achieving better, faster results through years of experience.
A guitar’s setup can be broken down into very complex scenarios and information, but a general walkthrough of the setup process needs to brush past most of that. The aim of this article is to familiarize the curious guitarist or the novice guitar technician with the process of a guitar’s setup and the minimal amount of adequate tools needed to execute it properly.
The Neck
As string tension is introduced to the neck, the neck starts bowing forwards. A truss rod is installed inside the neck to counteract the tension of the strings. By tensioning the truss rod, the neck will start to straighten out. Some relief is necessary to allow the strings to vibrate, unhindered, in their elliptical motion. Truss rod adjustments, whether tightening or loosening, should be made in subtle increments, approximately 1/16th -1/8th of a turn at a time is reasonable. You should never have to apply much force. If a truss rod has been tightened to its end point, further tightening will inevitably break the truss rod, leading to a costly repair… or the end of that neck.

If you are new to adjusting a truss rod, marking the truss rod nut before you adjust it is good practice. After making your adjustment, it serves as a reference. You may even notice that you are returning the truss rod tension to the same marked spot through changes in seasonal humidity. If trepidatious, please take your instrument to a professional.
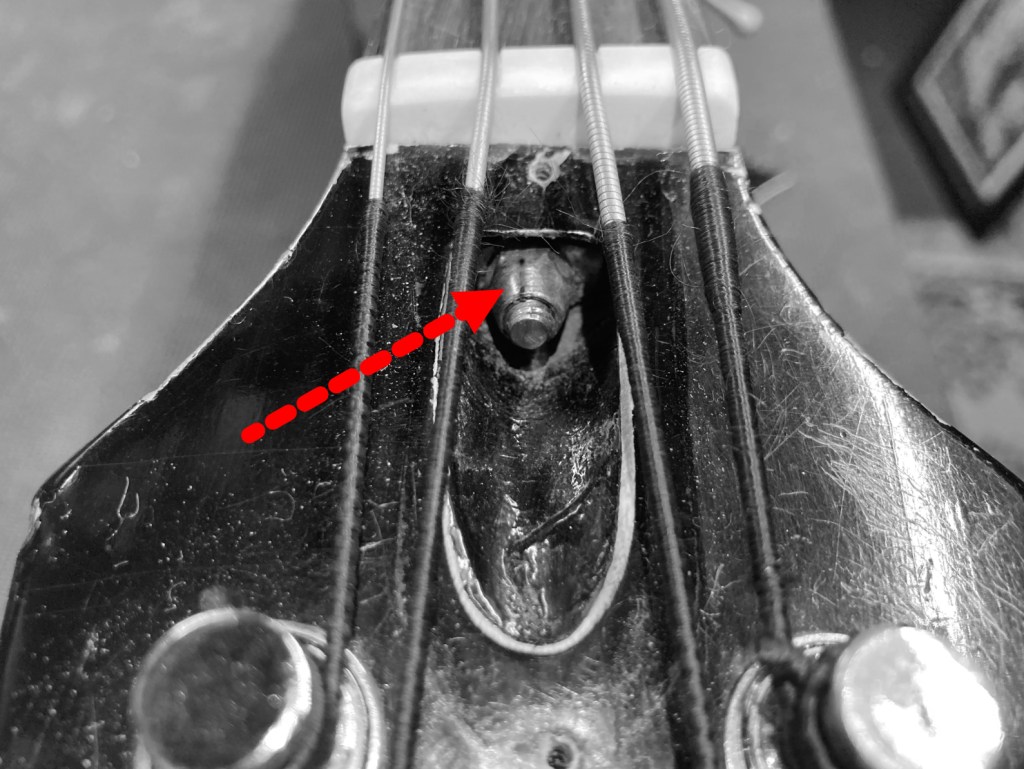
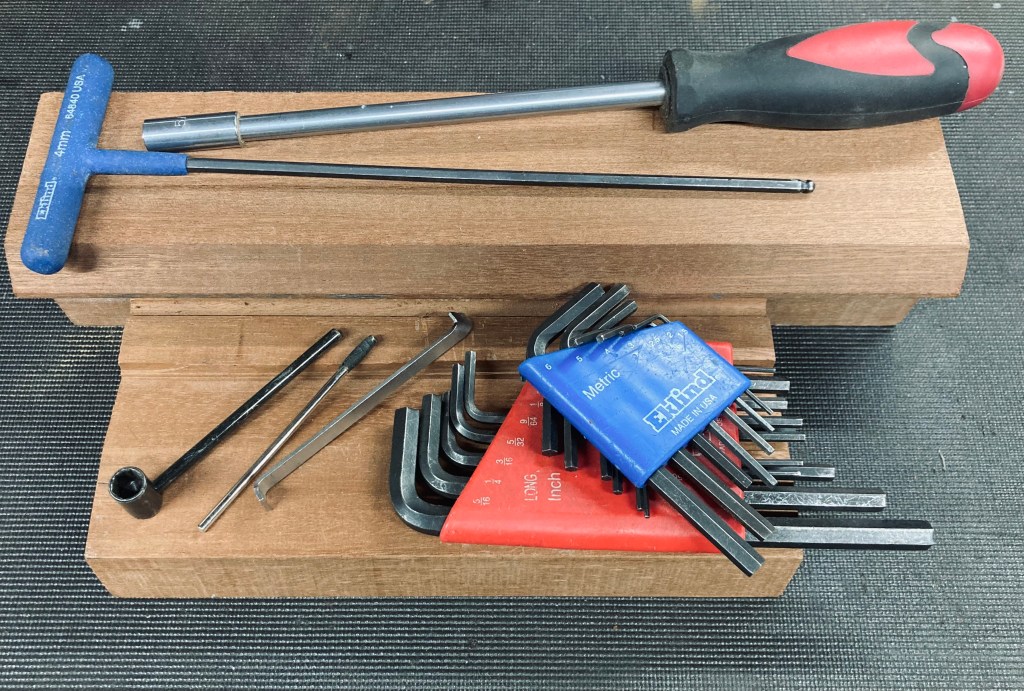
Truss rods come with a variety of adjustment nuts. Wether it’s a hex, Allen, spoke or flat blade, many of these tools are available at local hardware stores or easily found at luthier suppliers and other general tool resources. Only buy what’s appropriate to adjust your guitars. It’s easy to overload on unnecessary tool sizes, however, a full set of imperial and metric Allen wrenches are inexpensive and are useful across most guitar hardware and accessories.


A convenient way to measure the amount of relief in a neck is by using the strings as your straightedge. With a capo installed at the 1st fret, you can depress the last fret and seek out the area with the largest gap between the string and fret. This is usually between the 7th and 9th frets, roughly the middle point of the truss rod.

The Bridge
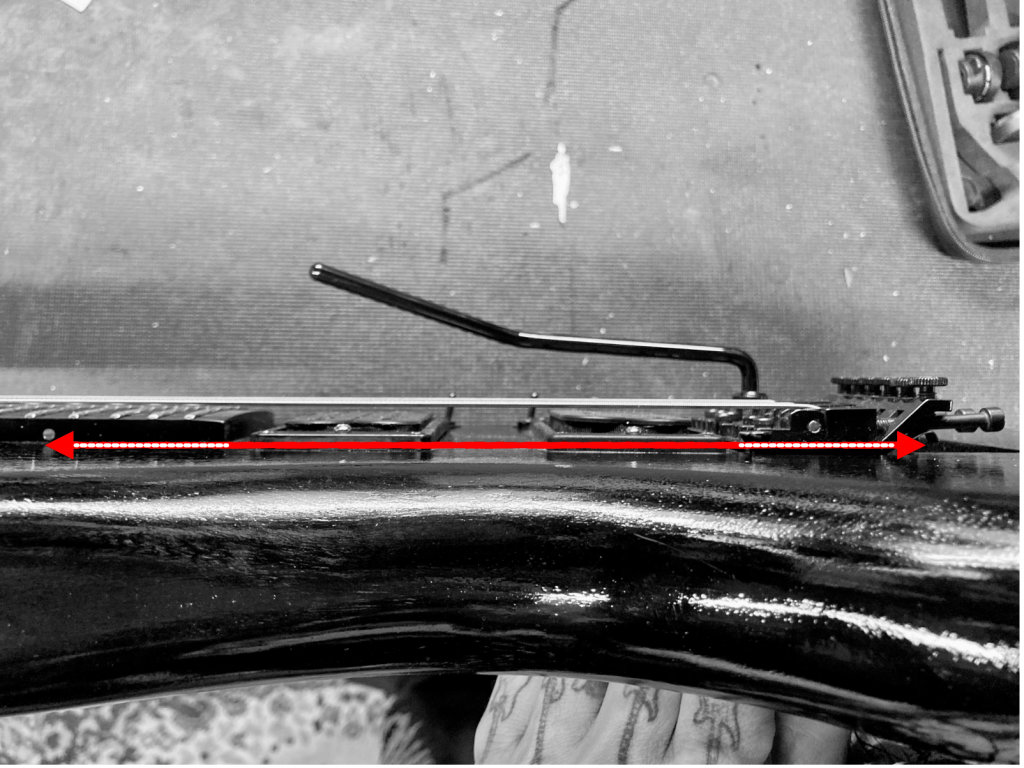
Once the neck has been adjusted, the bridge height will follow. Utilizing a capo on the first fret negates any issues at the nut, allowing an analysis of the relief in the neck and the bridge height. The string height at the nut will follow the bridge height adjustment so I typically use a capo. The capo should be close to the fret and provide just enough pressure to keep the strings in contact with the fret, playing clearly defined notes. A capo with too much pressure could arc the strings over tall frets and give you false measurements. You could also avoid a capo altogether and just fret the first fret while taking the measurements.

Post Bridges


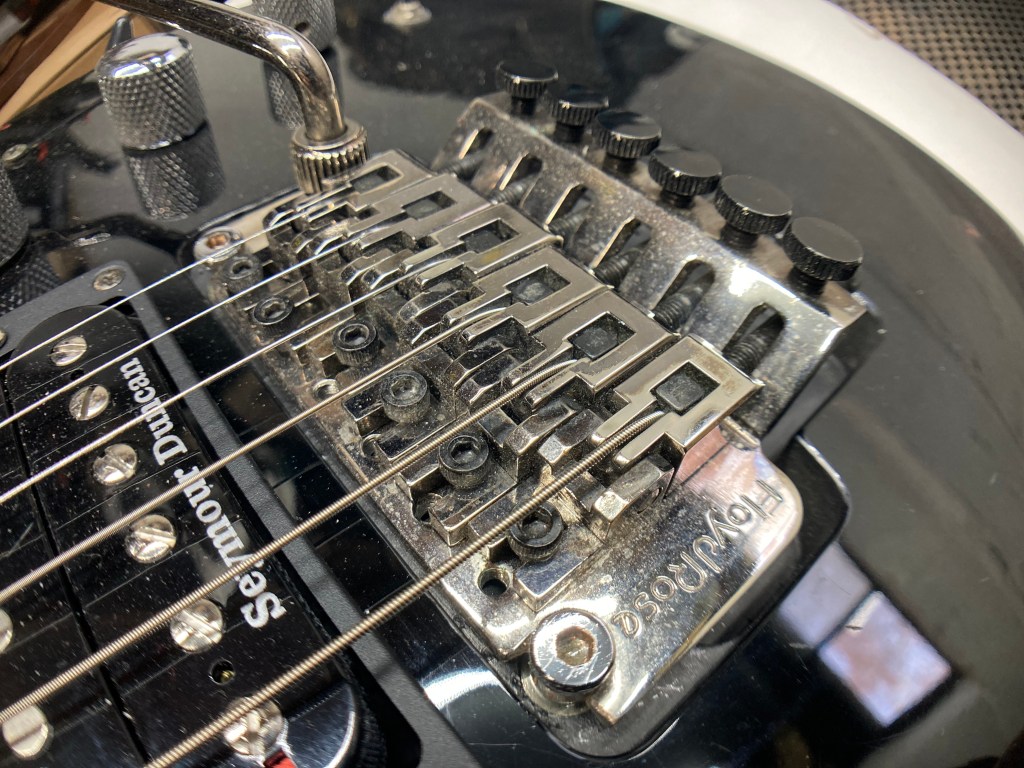
Some bridges, like a tune-o-matic, do not have individual adjustments for saddle height and must be adjusted by the posts on either side as a group. If the radius of the strings do not match the radius of the fingerboard, then the string slots in the saddles can be filed accordingly. When the radius of a vibrato bridge, like the Floyd Rose, needs correcting, shims underneath the saddles should be installed to correct any inconsistencies in the radius. Vibrato bridges work best when the baseplate is coplanar with the neck (illustrated below).

Individual Saddle Height Adjustments

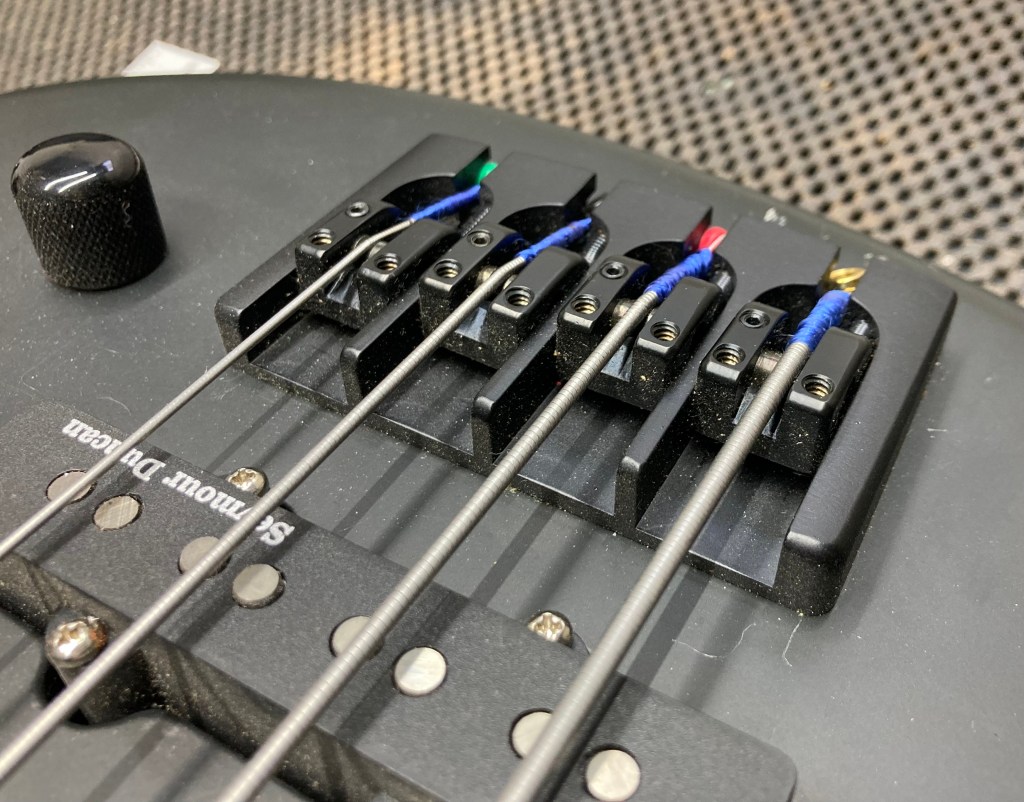

Non-locking vibrato bridges and mounted bridges offer the convenience of adjusting individual string height, or in the case of traditional telecaster bridges, pairs of strings.
Raise the bridge by turning the posts or screws counter-clockwise. Remember, raising the bridge, even just a small amount, will raise the pitch of the strings, pulling the neck forward. Lowering the bridge will take tension off the strings and neck, lowering their pitch. Always check and retune the strings after every adjustment.
String height measurements are often specified at the 12th, 15th, or 17th fret and are measuring the space between the top of the fret and the bottom of the string. Bridge height specifications will vary based on instrument type and may need to be altered due to string gauge, tuning, and the players preference.

While the intonation is also adjusted at the bridge, the string height at the nut needs to be adjusted first.
The Nut

Along with the truss rod, the nut is perhaps the other component that is fiddled with the least bit. Proper nut files are expensive and you need a whole set to file an instruments string gauge course accurately. As a teenager, I used to widen the slots on my guitars with plastic nuts by using the cut off ends of brand new wound strings. It worked, but it wasn’t very clean and accurate. My first set of nut files was one of the best investments I made and they are still in regular use on my bench. A few years ago, out of curiosity, I purchase an inexpesive keyring set of nut files (pictured among other tools below) in my interest of cheap alternatives for a guitarist to keep on hand. They are soft metal wires of graduating gauge with teeth cut into about half of their length. I was able to accurately file nut slots deeper into a plastic nut with relative ease, but any major height adjustment or cutting through dense synthetic nuts and bone were arduous. Conversely, Mitchell’s abrasive cord is fairly inexpensive and can widen, deepen, and clean up strings slots very effectively. I use it to deburr and deepen saddle slots as well.

The height of the strings passing through the nut is actually measured by their height over the 1st fret. The strings need enough clearance above the 1st fret to avoid hitting it, causing open-string buzzing, but not enough clearance to cause intonation issues.
The string must be able to move freely along its length through the string slot while tuning and bending, and have no room to move side-to-side, which could cause buzzing or even tuning instability. The larger the string diameter, the more tolerance for oversizing a string slot is gained, but it’s never much. For instance, a slot for a 0.009″ or 0.010″ high e string should be the same size as the string but as you get up to the wound strings (ie: the respective 0.042″ or 0.046″ low e strings of standard sets) you may experience no issues using a file 0.003″ – 0.004″ wider than the string. Bass strings can handle a slightly wider tolerance than guitar strings, but carefully rocking an undersized file to achieve the proper width is a stronger approach to the work.

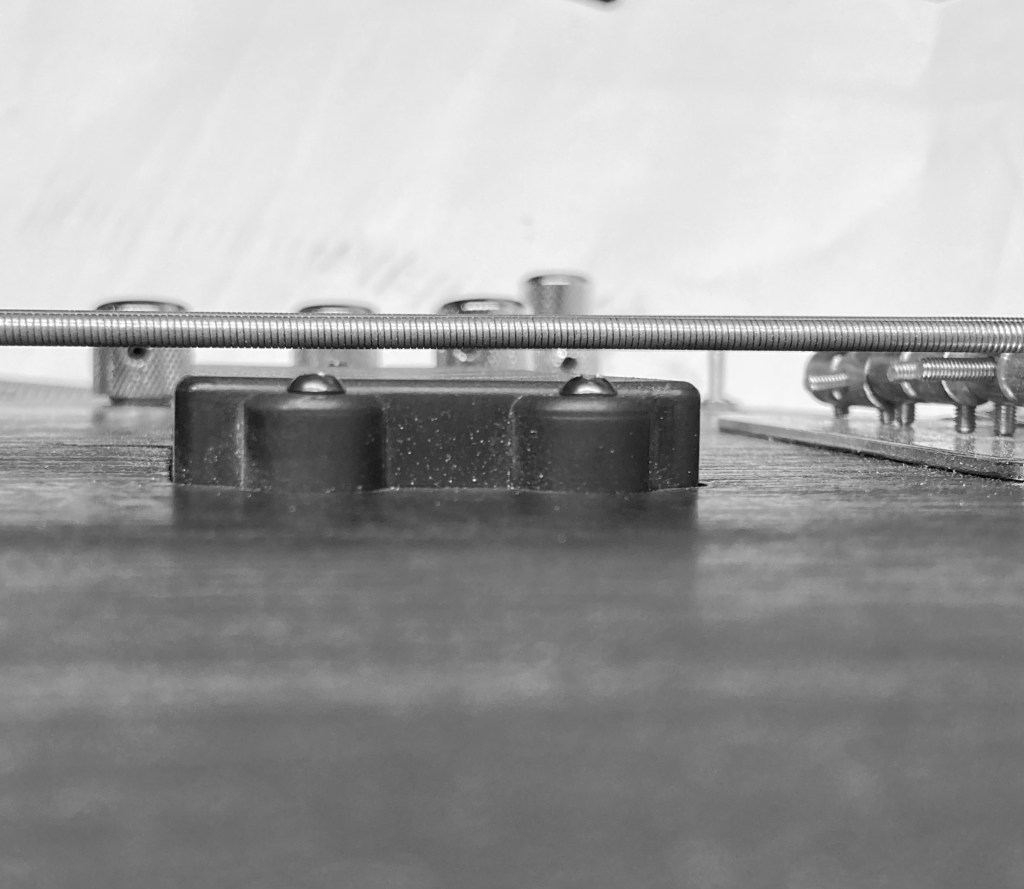
The string slots must also be cut so that proper end-tension is achieved as the strings slope downward to the tuners. If the highest point of a nut slot is at any point behind the front edge (illustrated below), buzzing and tuning issues will likely make themselves known. This can even be observed on the thin nuts of Fenders. Close attention and patience is required for any work made at the nut. Material can be removed easily, but not returned as much. Often, a mixture of shavings from the nut and superglue is used to add height to a string slot. Building up more than you need, allowing it to cure fully, and filing the slots again can prove successful, but strings can work their way through the filling over time. I prefer to never have it come to this temporary fix and take my time arriving to the proper depth.

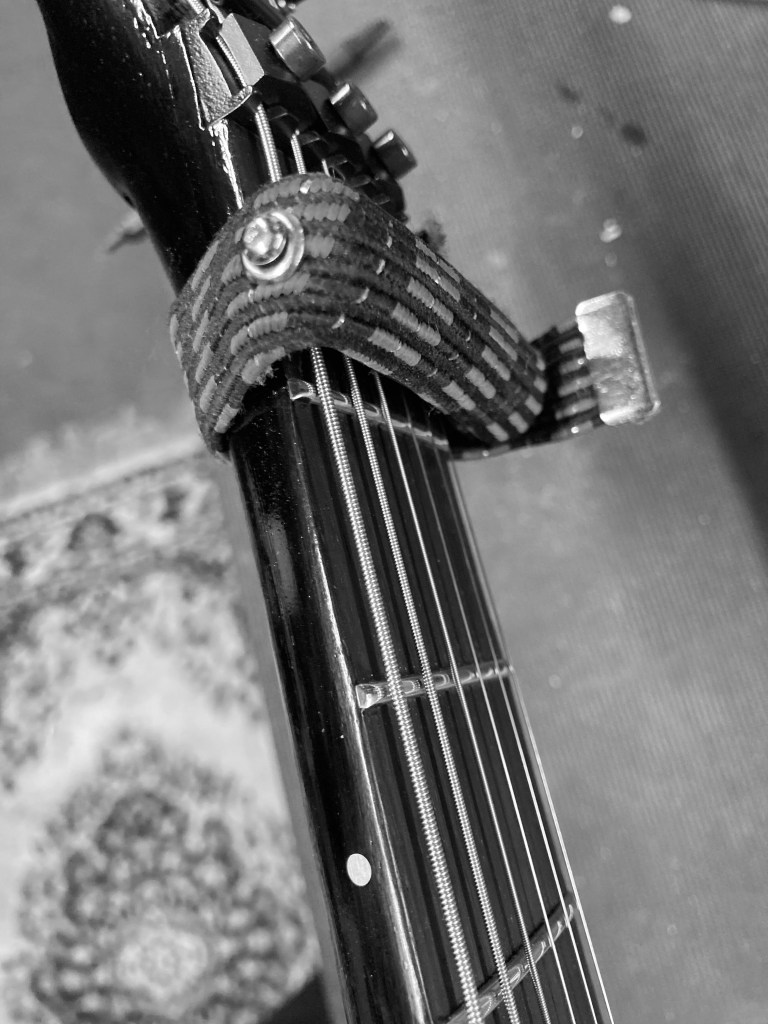
Locking Nuts
A locking nut is made of metal and, while filing could be useful in removing defective burrs or truing the radius, nut height adjustments should only be made with shims or level sanding of the nut shelf. It’s a bit more labor intensive and should not be done hastily.
For low nut height, business cards and sandpaper seem to be the standard shim materials still but you can buy metal shims in several thicknesses. These shims come in full size or partial sections, are shaped easily if needed, and can be stacked under the nut to achieve the right thickness. I occasionally make my own if I come into possession of thin metal sheet stock.

If the string height is too high, the nut shelf will need to be sanded down. If a string tree is installed, I will remove it so that I can slack the strings and part them on either side of the neck, removing and and installing the nut until the proper height is reached. When reinstalling the string tree, make sure there is enough pressure keeping the strings in contact with the nut on all of the strings’ paths through the nut. This will prevent the strings from going sharp every time you lock down the nut.
My old crowning file has served as a dedicated locking nut shelf sander, with different grits of adhesive sandpaper on each side. It was nearly the same width as the nut shelf. After removing the material I would square up the shelf with a chisel. As I grew older, acquired hand tools, and learned more traditional woodworking techniques, I started to favor files, chisels and planes over sandpaper. These days I just use some very sharp chisels when removing material from a locking nut shelf.
Another option would be to sand the bottom of the nut down instead of sanding the nut shelf. This is an easy way out and should be practiced by the impatient, or road techs in a hurry.

Pickup Height
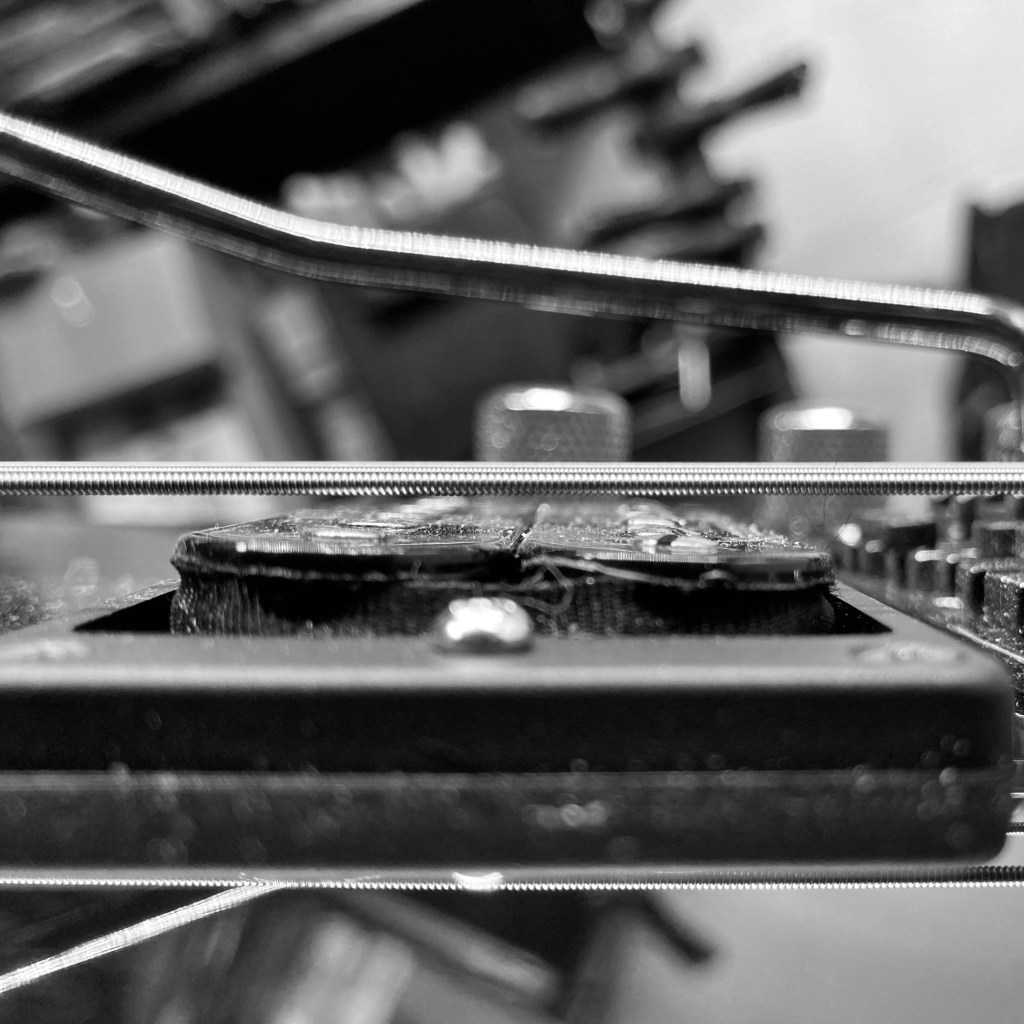
Pickup height is largely determined by ear. A great starting point is to fret the last fret and use the strings path to the bridge as a straightedge, matching the distance from the top of the pickup to the bottom of the string on each pickup, leaving anywhere from 1/8″ to 1/4″ gap in between. Keep each of the pickups balanced in volume from bass to treble side as you move them towards or away from the strings. Start with your dominant pickup and adjust the volume of the other pickups (if applicable) to match in volume, unless this is undesired in your playing. Pickups with stronger magnets pull more on the strings and will require more standoff distance than weaker ones. Active pickups can be set closer to the strings than passive pickups due to their lower impedance.
As previously stated in other blogs, I strongly recommend anyone to experiment with their pickup height. The impact could be profound: a low pickup could be an unfortunate motivator for a guitarist, oblivious to the problem, to go out and buy a new pickup or even an amp. I say this because this actually does happen. I’ve heard the regretful admission of a few clients of mine over the years and this is why I like to stress the importance of a guitar’s setup. Furthermore, high pickups have resulted in clients believing pickups were microphonic and have been the culprit for strings buzzing up and down the neck: the magnetics were significantly affecting the strings natural vibrational paths.
Intonation

After all the areas of a setup have been adjusted to suit the playability of the instrument, the intonation is the final step in solidifying the setup. Intonation is adjusted by moving the strings saddle (or the bridge’s intonation screws on the posts) forward or backward. The open string or the 12th fret harmonic (perfectly in tune) is played and then compared to the 12 fret, the octave of the open string and unison of the harmonic. Fret the note with normal playing pressure. If the note played is sharp this means that the saddle is positioned too close to the 12th fret (the playable strings halfway point) and needs to be moved backward, extending this distance. Retune and adjust the saddle until a unison pitch is achieved. Conversely, you would move a saddle towards the 12th fret is the fretted note plays flat.

When you achieve a unison pitch at the 12th fret, you should play up and down the string, especially in areas everyone plays- the first few frets. This is often the point where general nut height specifications can reveal that they are nothing more than that: general specifications not particular to any one instrument. This is why I stated in the prologue that I’ve learned to adjust areas of the setup together. A general nut height can be reached initially but keep in mind that you may need to remove a little more material from some string slots to achieve proper intonation at the first few frets. This is the perhaps the most common issue I see with newly purchased low to mid-tier guitars.*
Vibrato bridges such as the Floyd Rose require a little more attention while adjusting the intonation. Saddles can be moved after loosening their mounting screws. Unless you slack the string you are intonating, you’ll be fighting string tension. Every string will need to be be re-tuned and checked after every adjustment – just like a mounted bridge- but the spring tension may need to be adjusted to keep the baseplate level through the intonation process. This part of the reason a setup on a guitar with a locking vibrato costs more: it takes more time, skill, and patience. I learned to setup and play guitar on a Floyd Rose and all of that experience boosted me when I worked for The ESP Guitar Company. Those who don’t know the Floyd Rose setup will avoid it as much as possible, including professional technicians. I sought them out and was recognized and respected for it.


Epilogue
In the beginning, setting up a guitar can be full of trials and tribulation. With the right tools and the right process, it could be a revelation: Your instrument could have been holding you back from developing as a player, or adjusting those pickups could negate that brand new $3000 amp you bought when you assumed the problem was your old amp. The more you familiarize yourself with the setup process or start to take on these duties yourself, you’ll see how many factors can contribute to the setup but also how much better your guitar will play after a few adjustments. You’ll also be able to communicate much more efficiently with a professional if you need to bring your guitar into a shop.
* The nut height has a high tolerance at most guitar factories quality control level, so long as it doesn’t buzz and the guitar appears to be able to intonate, send it on its way. It makes its way into store and on the wall, ready for you to test. Musical instrument manufactures used to rely on music stores to finish the setup in house. They knew the effects the climate would have on their instruments so they used to train retailers, who used to keep luthiers on hand. Except times have changed. Most of the small, respectable guitar shops have disappeared. Most guitar stores are occupied by a sales staff who have no background in musical instrument maintenance or repair nor have the tools in house to perform any work. What we’re left with is chain retailers that have almost every major guitar manufactures entire catalog of guitars yet none of them are setup or maintained well enough to sell themselves.
Equally upsetting is the lack of true quality control practiced by some guitar manufacturers. Every guitar made should be able to play in tune and hold it, yet year after year, decade after decade, mass quantities of guitars are manufactured to be sold for profit above quality, regardless of playability.
